What Is a Wall in Soccer Free Kick? Rules & Tactics Explained
A free kick wall is a line of defending players standing shoulder-to-shoulder between the ball and the goal. Its purpose is to block a direct shot, forcing the kicker to either shoot over it, around it, or pass. The wall must be a minimum of 9.15 meters (10 yards) from the ball, and its size and positioning are commanded by the goalkeeper.
Most people think the wall is just a human barrier. They miss the goalkeeper’s orchestration and the precise, timed jump that makes it work. The wall is a reactive shield, not a static fence. Get the timing wrong by a tenth of a second and the ball is in the net.
This guide breaks down the official rules, the goalkeeper’s critical role, the modern “draught excluder” tactic, and the split-second decisions that define set-piece battles.
Key Takeaways
- The wall must be at least 9.15 meters (10 yards) from the ball. Referees enforce this with vanishing spray.
- If three or more defenders form a wall, all attackers must stay at least 1 meter (1 yard) away until the ball is in play.
- The goalkeeper decides the wall’s size and position, balancing coverage of the near post with visibility of the far post.
- The “draught excluder” is a player lying behind the wall to block low shots, popularized by Ricardinho and Marcelo Brozović.
- A quick free kick bypasses the wall entirely if the ball is stationary and the referee hasn’t signaled for a ceremonial restart.
The Official Rules: Distance and Encroachment
The wall isn’t a suggestion. It’s governed by Law 13 of the association football free kick rules, published by the International Football Association Board (IFAB). Two measurements dictate everything.
First, the defensive distance. Every defending player must be at least 9.15 meters (10 yards) from the ball when the kick is taken. Referees pace this off. Since 2014, they’ve often used vanishing spray to mark the spot on the pitch. The spray creates a temporary line that disappears after a minute or two. It stops defenders from creeping forward.
Defending players forming the wall must be at least 9.15 meters (10 yards) from the ball until it is in play. If a defender is closer when the kick is taken, the referee may order a retake, unless the attacking team gains an advantage.
Second, the attacking distance. This one catches teams out. If three or more defenders form a wall, all attacking players must remain outside the area within 1 meter (1 yard) of the wall until the ball is in play. Break this rule, and the referee awards an indirect free kick to the defending team from the spot of the infringement.
The timing is critical. The ball is “in play” the moment it is kicked and moves. An attacker can sprint into the 1-meter zone immediately after that. But if they cross the line before the kick, it’s a foul.
TL;DR: Defenders stay 9.15m back. Attackers stay 1m away from a wall of three or more. Break the 1m rule, and you give away an indirect free kick.
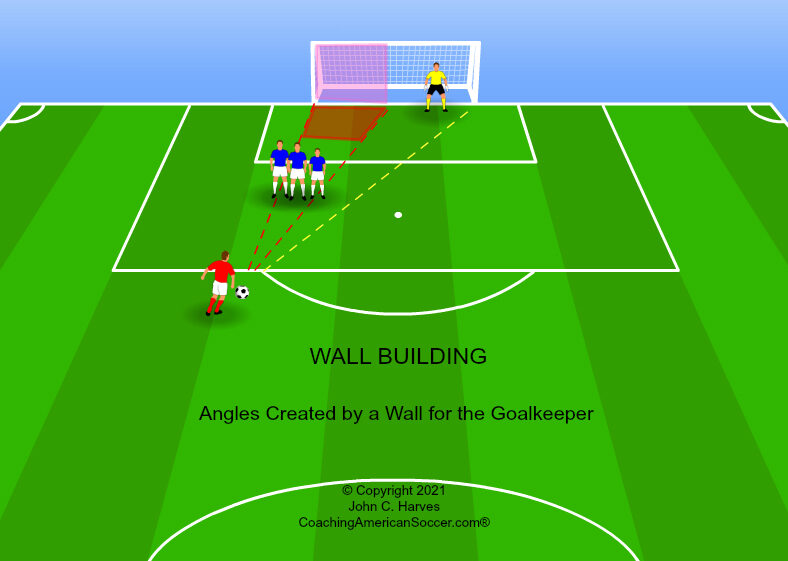
The Goalkeeper’s Command
The wall doesn’t build itself. The goalkeeper is the architect and foreman. Their first decision is binary: wall or no wall? For a central free kick 20 yards out, you’ll see a four or five-man wall. For an extreme-angle free kick from near the corner flag, the keeper might station a single player on the post and handle the rest alone.
The keeper’s primary goal is to cover the near post—the side of the goal closest to the ball. The wall’s job is to block that side, forcing the kicker to attempt a more difficult shot over or around the barrier toward the far post, which the keeper is already moving to cover.
I’ve seen goalkepers scream themselves hoarse at a defender who’s half a step out of line. That half-step creates a sliver of space a player like James Ward-Prowse or Lionel Messi will find every single time. The keeper sets the wall, then positions themselves on the far post side, trusting the wall but ready to react.
The number of players is a calculated trade-off. More players mean better coverage but also a bigger blind spot. A keeper behind a five-man wall might not see the ball until it’s already curling around the end of it. That’s why communication is constant until the whistle blows.
| Free Kick Position | Typical Wall Size | Goalkeeper’s Focus |
|---|---|---|
| Central, 18–25 yards out | 4–5 players | Organize wall, cover far post, watch for dip/swerve |
| Wide angle, near touchline | 1–2 players (or none) | Guard near post, command box, anticipate cross |
| Directly in front, very close (<18 yards) | 5–6 players + “draught excluder” | Set wall height, protect low corner, be ready for power blast |
TL;DR: The goalkeeper uses the wall to shield the near post, freeing them to defend the far post. Their shouted commands are the difference between a save and a goal.
How Many Players? A Strategic Choice
There’s no fixed number. It’s a dynamic calculation based on distance, angle, and the kicker’s reputation. The keeper makes the call.
For a dead-central free kick around 20 yards, you’ll typically see a four or five-man wall. This blocks a significant portion of the goal. From a wide angle, maybe one or two defenders stand in the way, often just to deter a direct shot and channel the play into a cross.
Common mistake: Using a full wall for every free kick — from a sharp angle, a large wall blocks the keeper’s view and is useless against a cross. The keeper ends up guessing.
The decision also depends on the kicker. Against a known specialist like David Beckham in his prime, keepers would add an extra man. Against a player who almost always passes, the wall might be smaller, with defenders assigned to mark runners instead.
The Draught Excluder Tactic
This is the player lying on the ground behind the wall. The nickname “draught excluder” comes from the small fabric sausage placed at the bottom of a door to block cold air. On the pitch, it blocks the ball.
The tactic emerged as a direct counter to players who perfected the low, driven shot under a jumping wall. Think of Ronaldo’s knuckleball free kicks or even earlier specialists. The wall jumps to protect faces and groins, but that creates a gap at ground level for about half a second.
The innovation is credited to Brazilian defender Ricardinho around 2013. He used it to stop those low shots, earning the nickname “the crocodile.” It went global after Inter Milan’s Marcelo Brozović used it against Barcelona’s Luis Suárez in a 2018 Champions League match. Today, it’s standard procedure for any central free kick within shooting range.
The player on the ground isn’t just lying there. They position themselves so their body fills the gap directly behind the wall’s lowest point. They also turn their head away from the ball and often cover it with their hands.
Building and Jumping: The Mechanics
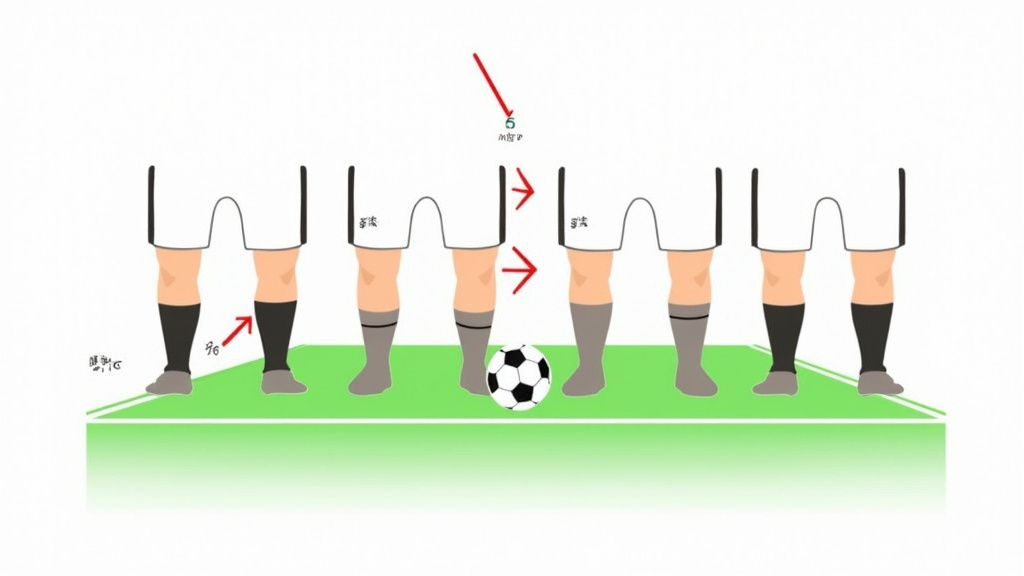
Getting the wall right is a practiced drill. It’s not just standing there.
First, the closest defender to the ball walks backward until the referee says stop or the spray line is reached. That player becomes the anchor. Others then join, interlocking arms or standing shoulder-to-shoulder to present a solid barrier. They must be in a straight line from the ball to the near post.
The jump is everything. The wall must jump in unison the moment the kicker’s plant foot hits the ground on their run-up. Jump too early, and the kicker can shoot under you. Jump too late, and the ball is already past your head.
Why the synchronized jump? It removes the low option and presents the tallest possible barrier at the exact moment of strike. A mistimed jump, where one player leaps while others stay planted, opens a hole. Professional teams practice this timing for hours.
Here’s the step-by-step process from the defender’s perspective:
1. Take your position. The goalkeeper or a designated leader shouts where to stand. Get tight to your teammates.
2. Protect yourself. Turn slightly sideways and bring your hands up to protect your face and groin. No one wants a broken nose.
3. Watch the kicker’s run-up. The trigger to jump is the plant foot hitting the ground. Not the start of the run, not the backswing—the plant foot.
4. Jump vertically. Don’t lean forward. A vertical jump maintains the wall’s line and keeps you from encroaching.
5. Land and react. The ball might be deflected, parried, or loose. Be ready to clear the rebound.
TL;DR: The wall builds from the anchor out, jumps on the kicker’s plant foot, and turns to protect vital areas. Mistiming the jump by a fraction of a second renders the wall useless.
Beating the Wall: The Attacker’s Playbook
For the kicker, the wall is a puzzle to solve. There are three main solutions, each requiring a different free kick technique.
Option 1: Go Over. This is the classic curving free kicks technique. You apply topspin and side spin to make the ball dip over the wall and into the top corner. It requires precise technique to clear the wall but still keep the ball under the crossbar. Specialists like Beckham’s technique made this famous.
Option 2: Go Around. Use extreme side spin to bend the ball around the end of the wall. This requires less height but more curve. The keeper often sees it late because the wall blocks their initial view.
Option 3: Go Under or Through. This is where the “draught excluder” has changed the game. The low, driven shot under a jumping wall is now much harder. The alternative is the quick, low pass to a teammate making a run, exploiting the moment the wall jumps and leaves the ground.
Common mistake: Attackers encroaching within 1 meter of the wall before the kick is taken — this gifts the defending team an indirect free kick from the spot of the offense, killing the attacking opportunity.
The smartest attackers watch the keeper. If the keeper is still organizing the wall, a quick free kick is legal and can catch everyone off guard. The ball just needs to be stationary. This bypasses the wall entirely. However, if the referee is enforcing the 9.15m distance for a ceremonial restart, they will signal that the kick cannot be taken until they blow the whistle.
Direct vs. Indirect: The Wall’s Relevance
This is a crucial distinction in the free kick definition. A direct free kick can be shot directly into the goal. The wall’s main purpose is to defend against this. An indirect free kick must touch another player before a goal can be scored. You’ll often see a wall for indirect kicks inside the penalty area, but its role is different—it’s trying to block the initial pass or shot, not a direct goal.
The referee signals an indirect free kick by raising an arm vertically until the ball touches a second player or goes out of play. If the referee forgets to signal and a goal is scored directly from an indirect free kick, the goal is disallowed and the kick is retaken. Knowing whether a kick is direct or indirect changes how a team sets its wall and how the kicker plans the play.
Frequently Asked Questions
Why do players lie down behind the wall?
This is the “draught excluder” tactic. It blocks low, driven shots that go under the wall when the defenders jump. It became a standard counter after players like Ronaldo mastered shooting under jumping walls.
Who decides how many players are in the wall?
The goalkeeper. They assess the distance, angle, and the kicker’s ability before shouting instructions to their defenders. The wall’s size is a strategic choice, not a fixed rule.
What is the official distance for a wall?
Defenders must be at least 9.15 meters (10 yards) from the ball. This is a universal law in soccer, enforced by referees who often use vanishing spray to mark the exact spot.
Can you take a free kick before the wall is ready?
Yes, if the ball is stationary and at the correct spot. This is called a quick free kick. However, if the referee is enforcing the defensive distance for a ceremonial restart, they will signal that you must wait for the whistle.
The Bottom Line
The wall is more than a human shield. It’s a timed, coordinated defensive unit governed by strict wall distance rules. Its effectiveness hinges on the goalkeeper’s command, the defenders’ disciplined jump, and the attacker’s ingenuity to find a way past it. Modern innovations like the draught excluder show that this ancient set-piece battle is still evolving. Whether you’re organizing a wall or trying to beat one, remember the core principles: distance, timing, and communication. Get one wrong, and the net will ripple.

I come from the “soccer heart” of Germany, the Ruhrpott. I have played, trained and followed soccer all my life and am a big fan of FC Schalke 04. I also enjoy following international soccer extensively.