How to Kick a Soccer Ball Correctly
This post contains affiliate links. As an Amazon Associate, we earn from qualifying purchases.
Your shots consistently sail over the crossbar. Your passes veer wildly off target. That frustrating gap between amateur and elite play often boils down to millimeters—your plant foot placement, ankle angle, and contact point. Learning how to kick a soccer ball correctly transforms every touch on the pitch, turning hopeful attempts into unstoppable strikes. This isn’t just about raw power; it’s about biomechanical precision that separates weekend warriors from professionals. Whether you’re a beginner or refining advanced skills, this guide reveals exactly why your technique fails and how to fix it with science-backed methods used by top players. You’ll master the instep drive, inside-foot pass, and curve mechanics while dodging common errors that sabotage accuracy.
Select Game-Ready Equipment Before Kicking

Ball Size and Pressure for Maximum Control
Grabbing the wrong ball sabotages your technique before you even swing your leg. Players 13+ must use a regulation size 5 ball (68–70 cm circumference, 410–450 g), while ages 8–12 need size 4 (63.5–66 cm), and 4–7-year-olds use size 3 (58.5–61 cm). Never skip the pressure check: inflate to 8.5–15.6 psi and verify by dropping the ball from shoulder height—it should rebound to half or two-thirds of the original height. Cold weather drops pressure by 0.5 psi per 10°C decrease, so recheck before winter training. On wet grass, control drops 18–25%, making proper inflation non-negotiable for clean contact.
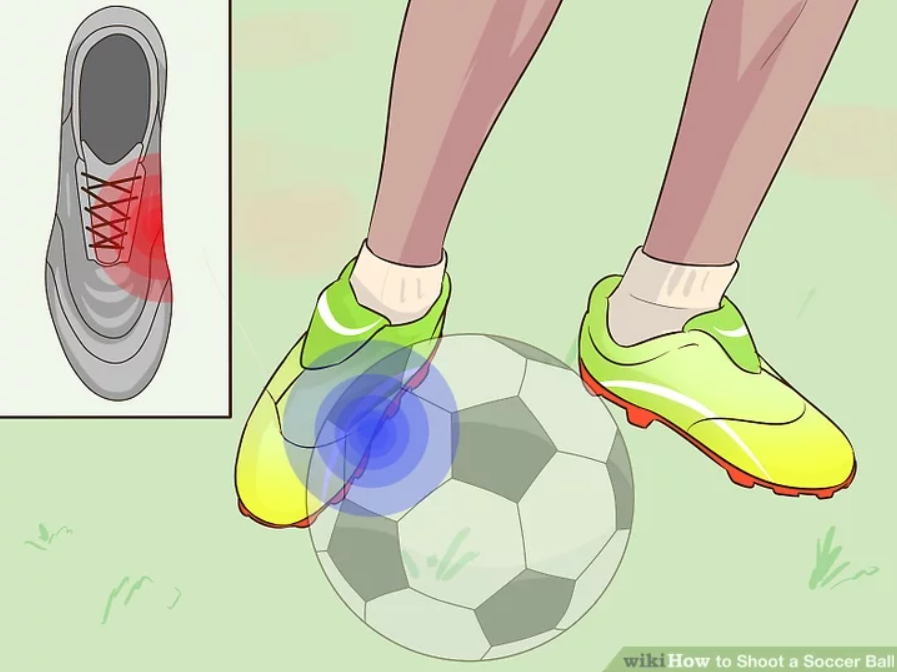
Cleat Selection That Matches Field Conditions
Your footwear dictates stability during the kick. For dry grass, firm-ground cleats with 12–13 conical or bladed studs (12–15 mm long) grip perfectly. Wet fields demand soft-ground metal studs (16–19 mm) to prevent slipping. Crucially, lace your boots so pressure feels firm across your instep—not tight enough to cut circulation or loose enough to slide inside the shoe. Indoor turf? Switch to flat gum-rubber soles with minimal tread. If you’re sinking into mud, shorten your steps and lower your center of gravity; on artificial turf’s extra bounce, strike the ball slightly lower to avoid topping it.
Perfect Your Body Positioning for Reliable Kicks
Plant Foot Placement That Fixes Accuracy Instantly
Your non-kicking foot controls 90% of your shot’s direction. Place it 15–20 cm beside the ball with toes pointing exactly where you want the ball to go. For power shots, angle this foot 45° from the ball; for chips, rotate it 90°. A plant foot positioned too far forward creates topspin, sending shots high and weak—adjust it back 5–10 cm if your shots sail over the goal. Too wide? Accuracy drops 25–30%; narrow your stance to hip-width. Practice this drill: place a cone where your plant foot lands and kick 20 passes daily until your foot consistently hits the target spot.
Upper Body Alignment for Power and Balance
Keep your head down, eyes locked on the ball’s contact point throughout your swing—lifting your head early is why 70% of beginners miss targets. Your opposite arm extends naturally for balance while your kicking-side arm tucks close to your body. Lean forward 10–15° for power shots (like a forward thrust), but stay upright when chipping over defenders. If you’re leaning back, 30–40% of your shots will fly over the goal—fix this by consciously driving your hips forward at contact. This subtle shift converts feeble dribbles into rocket shots.
Approach Angle and Stride Timing for Momentum
Build power with 4–5 controlled strides at a 30° angle to the ball. Your final step should be 25–30% longer than previous strides to generate forward momentum. For placement over power (like a tight pass), reduce to 2–3 steps with a straighter approach. Time your last stride so your plant foot lands 0.5 seconds before contact—rushing creates chopping motions that kill accuracy. Elite players approach at 3–4 m/s; use a stopwatch to time your runs until you hit this sweet spot.
Execute Every Kick Type with Professional Precision
Instep Drive: Unleash 120 km/h Power Shots
Strike the top third of the ball with your laces, ankle locked at 90° and toes pointed down. Drive through the ball’s horizontal plane—never scoop underneath it. Your follow-through must complete naturally, landing on your kicking foot. This technique sends balls 60–80 meters at 80–120 km/h for adults. Common mistake: over-swinging reduces accuracy by 20–30%. Fix it by focusing on controlled acceleration, not max effort. For youth players (U14), aim for 60–80 km/h radar readings—power comes from technique, not muscle.
Inside-Foot Pass: Achieve 90% Passing Accuracy
Use the flat inner foot between your first and second metatarsal heads for surgical precision. Contact the middle third for ground passes or lower third for slight elevation. This generates only 30–40% of your max leg strength but delivers ±2-meter accuracy at 40 meters. If passes stray, you’re likely toe-poking—lock your ankle and strike with the full instep surface. Practice against a wall: target 100 consecutive touches hitting a 1m x 1m square from 10 meters. Elite players hit 8/10 attempts in static tests; start with 4/10 and track weekly gains.
Chip and Lob: Bend Defenders with Backspin
Point toes up and strike the bottom quarter of the ball with an abbreviated swing (50–60% of full motion). This creates 1500–2000 rpm backspin for sudden drops after clearing defenders. For chips, use a 30–45° launch angle; for lobs, go 45–60°. Critical timing: contact the ball as it rises 0.3–0.5 meters off the ground. If the ball balloons, you’re leaning back—maintain that 10–15° forward lean. Mastery means clearing a 2-meter wall from 25 meters before the ball drops sharply at 0.5–1 meter per meter after peak height.
Diagnose and Fix Your Costliest Kicking Errors

Plant Foot Problems That Miss Targets by 5+ Meters
A plant foot 15° off-target creates a 5-meter miss at 30 meters. If your shots sail high, your foot is too far forward—move it back 5–10 cm. Wide stances (common when nervous) reduce accuracy by 25–30%; fix it by practicing kicks with feet hip-width apart. Drill: place tape on the ground marking ideal plant foot position. Kick 50 balls daily, yelling “TOES FORWARD!” as you plant to ingrain alignment.
Contact Point Mistakes That Waste 50% of Your Power
Toe-poking reduces power by 40–50% and eliminates accuracy. Focus on locking your ankle and striking with your laces. Scooping motions lift the ball without power—drive through the center instead of under it. If shots fly over goal, lean forward 10–15° and contact the ball’s horizontal midline. Track progress with radar gun tests: adult males should hit 95–130 km/h; females 80–100 km/h. If you’re below 80 km/h, revisit ankle lock drills.
Swing Path Corrections for Consistent Accuracy
Over-swinging reduces accuracy by 20–30%. Replace max effort with controlled acceleration—imagine swinging through a narrow gate. Chopping motions cause inconsistent contact; develop a smooth pendulum swing by practicing kicks with eyes closed to feel rhythm. Poor hip rotation costs 25% potential power; do daily Nordic curls and 10 hip circles each direction to fix it.
Build a 12-Week Training Plan That Delivers Results
Start with 20 daily passes and 20 shots from 5 meters, targeting 50% accuracy. Weeks 5–8 expand to 10–20 meter passing under pressure with 50% success rates—dedicate 30% of time to your weak foot. By weeks 9–12, practice 5v5 small-sided games with 70% accuracy while marked. Track progress: elite players hit 8/10 attempts on 2x2m targets from 20 meters. For rapid gains, focus on 200–300 quality daily contacts—not marathon sessions. Record form weekly with phone video; compare your plant foot angle to pros.
Adapt Technique to Weather and Surfaces Immediately
In rain, increase plant foot pressure by 20–30% to prevent slipping on wet grass. Compensate for wind by adjusting aim 1 meter per 10 km/h wind speed—cross-winds increase curve by 20%, so aim wider. Cold weather reduces power 10% per 10°C below 20°C; warm up 5 minutes longer with dynamic stretches. On artificial turf’s extra bounce, strike the ball slightly lower; in mud, shorten steps and lower your center of gravity. Sand training? Expect 30–40% power loss but use it to refine ankle lock technique.
Prevent Kicking Injuries with Smart Protocols
Skip warmups and 25% of injuries (groin strains) and 20% (hamstring pulls) strike. Start every session with 5 minutes of dynamic warmups: 10 hip circles each way, 15 forward/lateral leg swings, 20 ankle rotations, and progressive passes at 5/10/20 meters. If pain exceeds 3/10 during kicking, ice for 10 minutes immediately. Use contrast therapy (3 minutes hot/1 minute cold x3) within 24 hours. Return to light technique work after 48 hours, full power after 72+. Monitor daily flexibility—if your range drops, reduce intensity.
Mastering how to kick a soccer ball correctly transforms your game from hopeful to lethal. Focus on plant foot precision, ankle lock, and driving through the ball—not raw power. Implement the 12-week training plan, starting with 50 daily quality kicks while filming your form. Within 30 days, you’ll see passes hitting targets consistently and shots dipping under the crossbar. Remember: consistency beats intensity. Your next touch is your chance to apply these techniques—so lace up, check your ball pressure, and strike with purpose. The difference between a hopeful kick and a unstoppable strike is measured in millimeters, and now you know exactly how to own them.

I come from the “soccer heart” of Germany, the Ruhrpott. I have played, trained and followed soccer all my life and am a big fan of FC Schalke 04. I also enjoy following international soccer extensively.