Offside Rule in Soccer Explained with Diagram
This post contains affiliate links. As an Amazon Associate, we earn from qualifying purchases.
You’re watching a perfect through-ball split the defense, your striker is clean through on goal—then the linesman’s flag shoots up. Offside. Again. This frustrating moment haunts players, coaches, and fans at every level of soccer. Understanding the offside rule with diagram soccer scenarios makes the difference between confused frustration and tactical mastery. Whether you’re a weekend warrior, youth coach, or armchair analyst, this guide transforms abstract rules into actionable knowledge you can apply immediately—no law degree required.
The offside rule shapes every attacking move and defensive setup in modern soccer. Master these concepts, and you’ll read the game like a seasoned pro—anticipating calls, exploiting defensive gaps, and coaching your team to stay one step ahead. This isn’t just about avoiding penalties; it’s about weaponizing the rule to create scoring opportunities your opponents never see coming.
Why Your Striker Gets Flagged Despite Being “Onside”
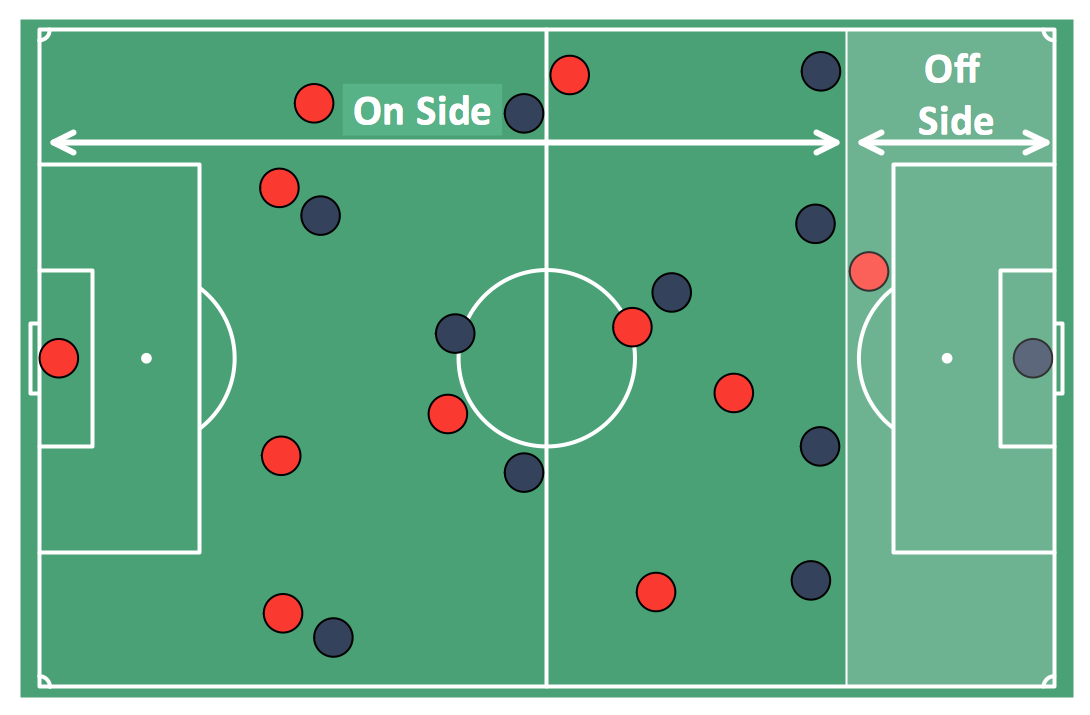
A player commits an offside offense when they’re positioned closer to the opponent’s goal line than both the ball and the second-last defender at the exact moment the ball is played by a teammate. This positioning must occur in the opponent’s half, and the player must become actively involved in play. Crucially, merely standing in an offside position isn’t enough—you must participate in active play to be penalized.
Reading the Offside Line in Real Time
“`
Attacking Direction →
                              Goal Line
                                |
|---|---|---|---|---|---|---|---|---|---|
|   |   |   |   |GK |   |   |   |   |
|   |   |   |   |   |   |   |   |   |
|---|---|---|---|---|---|---|---|---|---|
|   |   |   |DF2|   |   |   |   |   |  ← Second-last defender
|   |   |   |   |   |   |   |   |   |
|   |   |   |   |   |   |   |   |   |
|---|---|---|---|---|---|---|---|---|---|
|   |   |   |   |   |   |FW |   |   |  ← Forward in OFFSIDE position
|   |   |   |   |   |   |   |   |   |
“`
The offside line forms at the second-last defender’s position (usually the last outfield player). In this diagram, the forward (FW) is beyond both the second-last defender (DF2) and the ball, making them offside. Assistant referees track this line constantly during play, raising their flag the instant an offside offense occurs.
Level Position = Legal Play
“`
Level Play – NOT Offside:
|—|—|—|—|—|—|—|—|—|—|
| | | |DF2| |FW | | | | ← Level with defender
| | | | | | | | | |
|—|—|—|—|—|—|—|—|—|—|
Own Half Exception:
|—|—|—|—|—|—|—|—|—|—|
| | | | | | | | | |
| | | | | | |FW | | | ← In own half – always legal
| | | | | | | | | |
“`
Players level with the second-last defender are never offside—a critical nuance attackers exploit by timing their runs. Additionally, players cannot be offside in their own half, regardless of defender positioning. This exception enables long balls played from midfield without immediate offside calls.
When Offside Becomes a Penalty
Three Conditions That Trigger the Flag
A player in offside position becomes penalized only when they:
– Interfere with play by touching the ball after a teammate’s pass
– Block opponents by obstructing their vision or movement path
– Gain advantage from rebounds off goalposts, crossbars, or defenders
Offside Reset Exceptions You Must Know
Players cannot be called offside from:
– Goal kicks (regardless of positioning)
– Throw-ins (anywhere on the field)
– Corner kicks (even directly in front of goal)
– Deliberate opponent plays (when defenders intentionally touch the ball)
Assistant Referee Signals Decoded
Flag Mechanics That Determine Your Game
- Initial Position: Assistants stay perfectly level with the second-last defender throughout play
- Decision Point: Judgment happens at the exact moment the ball leaves a teammate’s foot
- Flag Signal: Vertical flag raise followed by directional point to offense location
- Delayed Flag: Keeping the flag down during clear goal-scoring opportunities
VAR Technology Transforming Offside Calls
Modern officiating combines human judgment with precision technology:
– Semi-automated systems track 29 body points per player at 50 frames per second
– Calibration lines determine exact offside positions using 12+ camera angles
– 3D animations visualize complex decisions for fans and coaches post-match
Tactical Applications That Win Games

Executing the Perfect Offside Trap
Defensive units catch attackers offside through coordinated movements:
– Timing: Step forward in unison milliseconds before the pass releases
– Risk Management: Mistiming creates 1v1 goal-scoring chances—practice relentlessly
– Communication: Use verbal cues like “step” or “hold” to synchronize movements
Beating the Trap: Attacker’s Playbook
Smart forwards stay onside with these techniques:
– Shoulder checks every 2-3 steps to monitor defender positioning
– Curved runs that stay level with defenders until ball release
– Delayed acceleration where the final burst comes after the pass
Debunking Top Offside Myths
Myth: “You’re offside if the ball touches you in an illegal position”
Fact: The offense occurs when the ball leaves your teammate’s foot, not when you receive it. A player can legally receive a pass even if they were offside when it was played, provided they return to an onside position before touching it.
Myth: “The goalkeeper always counts as the last defender”
Fact: Any player can be the second-last defender—goalkeeper position is irrelevant. If the keeper moves upfield, a defender becomes the last outfield player for offside determination.
Myth: “Players can’t be offside in their own half”
Fact: This is actually true—the rule explicitly excludes the player’s defensive half. Players receiving the ball in their own half are never offside, enabling midfield through-balls.
Handling Complex Offside Scenarios
Rebound Situations: Post, Keeper, or Defender
When an attacker shoots and the ball rebounds:
– Offside applies if a teammate was in illegal position during the original shot
– No reset occurs from goal frame contact or keeper saves
– Deliberate plays by defenders reset offside—deflections do not
Injured Defender Situations
If a defender leaves the field injured:
– Still counts for offside determination until the next stoppage
– Cannot exploit temporary numerical disadvantage
– Lines adjust to new second-last defender position
Practical Drills to Master Offside Positioning
Visual Training for Players and Coaches
- Freeze Frame Analysis: Pause game footage at pass moment
- Line Drawing: Sketch the offside line based on second-last defender
- Player Check: Identify which attackers are legal/illegal
- Consequence Prediction: Determine the correct call before resuming play
Team Communication Drills
- Defensive Calls: Practice “step,” “hold,” or “drop” commands during live play
- Attacking Timing: Work on synchronized movement with midfielders
- Flag Awareness: Train checking assistant referee positioning during runs
Offside Quick Reference Checklist
Before every attacking move, quickly assess:
– [ ] Is attacking player in opponent’s half? (Own half = always legal)
– [ ] Are they beyond second-last defender? (Include all body parts except arms)
– [ ] Will they become actively involved? (Touching ball, blocking opponents, gaining advantage)
– [ ] Did ball come from legal restart? (Goal kicks, corners, throw-ins never offside)
What to Do When You Disagree with an Offside Call
When the flag goes up but you believe it’s incorrect:
– Coaches: Note the minute for potential VAR review in professional matches
– Players: Immediately check positioning—most errors come from mistimed runs
– Fans: Look for body part positioning—modern VAR measures to millimeter precision
– All: Remember that “clear and obvious error” is the standard for overturning decisions
Mastering the offside rule transforms your soccer experience from passive observation to active strategic thinking. Whether you’re coaching youth players, analyzing professional matches, or simply wanting to understand why that flag went up, these fundamentals provide the foundation for deeper tactical appreciation. Study the diagrams, apply these concepts in real-time viewing, and soon you’ll anticipate calls before officials make them—turning this complex rule from frustration into your tactical advantage. The next time you see that perfect through-ball, you’ll know exactly when your striker is truly onside and ready to score.

I come from the “soccer heart” of Germany, the Ruhrpott. I have played, trained and followed soccer all my life and am a big fan of FC Schalke 04. I also enjoy following international soccer extensively.