How to Do a Rainbow in Soccer: The 5-Step Guide That Works
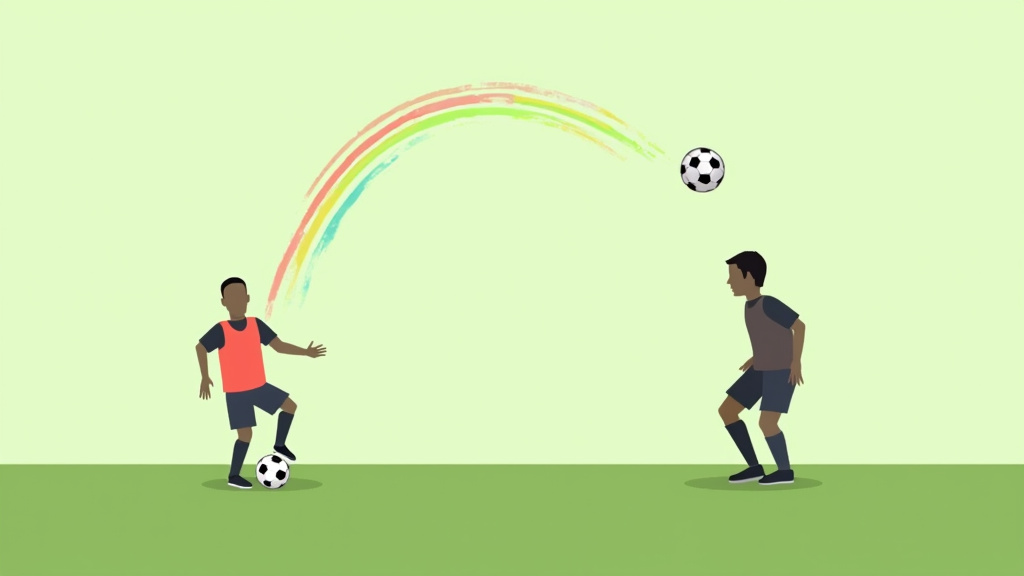
To do a rainbow in soccer, you roll the ball up the back of your calf with one foot and flick it over your head with the heel of the other. The five core steps are: master the stationary roll, practice the flick, combine them into one fluid motion, add a dribbling approach, and finally execute it over a defender. Success hinges on a quick, forceful sweep up the leg and a forward lean during the flick.
Most tutorials tell you to practice stationary first. They skip the part where the ball slips off your calf if your foot angle is wrong. That angle is the difference between a flick that arcs and one that rolls sideways into the grass.
This guide breaks down the five steps, the foot placement that actually works, and the one variation that lets you pull this off without dribbling at all. We’ll cover the drills that build the muscle memory, the moment you should never attempt it, and how to avoid the ankle strain that comes from bad form.
Key Takeaways
- The ball must be pressed firmly against your calf during the roll. A loose touch sends it sideways.
- Lean forward as you flick. Staying upright sends the ball straight up, not over your head.
- Practice the stationary version for at least two weeks before adding dribbling. The muscle memory is non-transferable if you rush.
- The entire motion from trap to flick should take less than a second. Hesitation gives the defender time to react.
- In a real match, use it only when you have clear space behind the defender. Attempting it in a crowded midfield is a guaranteed turnover.
The 5-Step Rainbow Flick Breakdown
The rainbow flick isn’t about strength. It’s about a specific sequence of foot placements and a forward body tilt. Missing one piece collapses the whole trick.
Start with the ball stationary between your feet. Your dominant foot is forward, your non-dominant foot is behind the ball. Use your non-dominant foot to roll the ball up the back of your dominant leg.
The non-dominant foot sweeps the ball upward along the inside of the calf, pressing it against the leg until it rests just above the heel of the dominant foot. This creates the leverage point for the flick.
Your non-dominant foot lands as you complete the roll. Now flick the ball upwards with the heel of your dominant foot. The forward lean is critical. If you stay upright, the ball goes vertical. Lean your torso forward as your heel strikes the underside of the ball. That forward momentum creates the rainbow arc.
TL;DR: Roll the ball firmly up your calf, flick with your heel while leaning forward, and execute both steps in one continuous motion.
Step 1: Isolate the Roll
Place the ball on a flat, dry patch of grass or concrete. Stand over it, feet shoulder-width apart. Use your non-dominant foot to scoop the ball and roll it up the inside of your dominant calf.
The ball should travel from your ankle to just above your heel. The touch needs to be firm. A gentle nudge lets the ball fall off the leg before the flick. Do this fifty times. Your goal is to get the ball to that heel-pocket position consistently.
Common mistake: Rolling the ball with the outside of your foot, the ball spins away from your body and you can’t flick it. Use the inside of your foot, almost like you’re cradling the ball against your leg.
If the ball keeps falling, your foot angle is wrong. Adjust your non-dominant foot so the inside surface is flush against the ball. It’s a scoop, not a push.
Step 2: Isolate the Flick
Now forget the roll. Hold the ball in your hands and drop it just behind your dominant heel. Practice flicking it upward with that heel. Don’t worry about the arc yet.
Focus on the strike point. You need to hit the bottom third of the ball. Striking the middle sends it forward, not up. Striking the top sends it down. Find that sweet spot by dropping the ball and flicking twenty times.
Add the lean. As you flick, bend your torso forward. This isn’t a slight tilt. You need to commit. Your shoulders should dip toward the ground as your heel makes contact. That forward momentum changes the ball’s trajectory from vertical to arcing.
Step 3: Combine Roll and Flick
This is where people fail. They practice each part separately but can’t stitch them together. The transition from roll to flick must be instantaneous.
Start slow. Roll the ball up your calf. As your non-dominant foot lands, flick with your heel. Do it in two distinct motions at first. Once you can do that ten times without dropping the ball, speed up. The goal is a single, fluid movement: sweep up, flick over.
The rhythm is the secret. It’s a one-two count. “Sweep” (roll) is one, “flick” (heel strike) is two. If you pause between them, the ball loses momentum and falls.
Step 4: Add the Dribble
You can’t just stand there in a match. Now you need to do this while moving.
Dribble the ball slowly toward a wall or a cone. As you approach, place your dominant foot in front of the rolling ball. Use your non-dominant foot to trap it against your dominant heel. Then execute the roll-and-flick sequence you mastered in step three.
The trap is the new variable. Your non-dominant foot must stop the ball’s forward roll and pin it against your heel in one motion. If you trap it too softly, the ball squirts out. Trap it too hard, you lose your balance. Practice this against a stationary object twenty times before even thinking about a defender.
Step 5: Execute Over a Defender
Finally, add a human element. Have a friend stand passively as a defender. Dribble toward them. Trap, roll, flick. Aim to send the ball over their head, not just over yours.
Run around them to collect the ball. This is the full trick. The timing now depends on their position. If they’re too close, the ball won’t have space to arc. If they’re too far, you’ve wasted the move. The ideal distance is about one yard.
| Step | Focus | Failure Sign |
|---|---|---|
| Isolate the Roll | Ball pressed firmly against calf | Ball rolls off leg sideways |
| Isolate the Flick | Heel strikes bottom third of ball | Ball goes forward or down |
| Combine | No pause between roll and flick | Ball drops between motions |
| Add Dribble | Trap ball against heel while moving | Ball squirts out before flick |
| Over Defender | Judge distance (1 yard ideal) | Ball hits defender or falls short |
TL;DR: Build the trick in layers: stationary roll, stationary flick, combine them, add dribbling, then add a defender. Skipping a layer means the next one won’t work.
Why Your Rainbow Fails (And How to Fix It)
You practiced for hours. The ball still plops to the ground. The problem is usually one of three things.
First, the ball isn’t locked against your calf during the roll. You’re using the outside of your foot or a timid touch. The ball needs to be cradled by the inside of your foot and pressed into your leg. If it’s loose, it spins out.
Second, you’re flicking with your instep, not your heel. The instep sends the ball forward. The heel, because it’s behind the ball, sends it upward. Check your foot position. Your dominant foot should be slightly turned inward so the heel is presented to the ball.
Third, you’re not leaning. This is the most common physical mistake. The forward torso dip adds the horizontal vector to the ball’s flight. Without it, you’re just kicking the ball straight up. It comes down on your head, not over it.
I spent a week trying to rainbow a ball in my backyard with a Adidas Telstar. Every flick sent it straight up and back down onto my shoulders. The moment I committed to a real forward lean, chest almost parallel to the ground, the ball finally arced. It wasn’t stronger kicks. It was a deeper lean.
Fix these by returning to step two. Isolate the flick with the lean. Drop the ball, flick with your heel, and force your torso forward. Do that thirty times. Then go back to the full sequence.
The Stationary vs. Dribbling Decision
Most guides insist you learn the stationary version first. They’re right, but they don’t tell you why. The muscle memory for a stationary rainbow is different from a dribbling rainbow.
When you’re stationary, your balance is centered. When you’re dribbling, your weight is shifting forward. If you learn only the stationary version, your first dribbling attempt will fail because your body is fighting two impulses: the trick’s motion and your forward momentum.
The solution is to graft the dribbling layer early. After you can do five stationary rainbows in a row, introduce a slow dribble toward a cone. Don’t wait until you’re perfect at stationary. Blend the two.
Here’s a drill schedule that works:
1. Day 1–3: Isolate the roll and flick separately.
2. Day 4–7: Combine them stationary.
3. Day 8–10: Add a slow dribble toward a cone.
4. Day 11–14: Practice over a passive defender.
If you try to go from day seven stationary to day eight over a defender, you’ll stall. The dribbling step is the bridge.
When to Use a Rainbow (and When to Skip It)
This trick is showboating. In a competitive match, it’s a risk. But there are moments where it’s not just flash, it’s functional.
Use a rainbow when a defender is closing you down from the front, and you have open space behind them. The ball goes over their head, you run around them, and you’re gone. It’s a surprise element. Jay-Jay Okocha used it this way.
Use it when you’re pinned against the sideline with a defender blocking your path forward. A quick rainbow over their head can switch the angle and open the field.
Common mistake: Attempting a rainbow in a crowded midfield, three other players are within two yards. The ball gets intercepted before it lands, or you get tackled during the flick. Only use it when the defender is isolated.
Never use it as a first move against a defender you’ve never faced. If they’re quick, they’ll read the setup and step backward, catching the ball on the descent. Use it after you’ve tested their reaction speed with a few simple feints.
The rainbow flick has a low success rate in professional matches because defenders anticipate it. In street soccer or casual games, it’s more effective because the defensive pressure is less organized. Know your context.
Advanced Variations: The Ronaldinho Flick-Up

The classic rainbow requires dribbling. The Ronaldinho flick-up, sometimes called the ankle lock, doesn’t.
Stand with the ball stationary between your feet. Lock it between your ankles by squeezing your feet together. Then jump slightly, flicking the ball upward with both heels simultaneously. The ball pops up vertically. You can then head it, volley it, or let it drop for a control move.
This variation is useful when you’re stationary and need to elevate the ball quickly to evade a tackle. It’s less about beating a defender overhead and more about creating an immediate second touch opportunity.
The mechanics are simpler than the full rainbow, but the ankle lock requires strong calf tension. If your feet aren’t tight, the ball slips out.
| Variation | Best For | Key Difference |
|---|---|---|
| Classic Rainbow Flick | Beating a defender overhead | Requires dribbling and a forward lean |
| Ronaldinho Flick-Up | Quick elevation from stationary position | Uses ankle lock, no roll needed |
| Neymar Rocket (Ankle Lock + Roll) | Combining elevation with immediate control | Starts with ankle lock, ends with a controlled roll |
TL;DR: The classic rainbow beats a defender. The Ronaldinho flick-up gets the ball off the ground fast when you’re stuck. Choose based on whether you’re moving or stationary.
Building the Confidence to Try It
The rainbow is a mental trick as much as a physical one. You hesitate because you’re afraid of failing in front of teammates or opponents.
Start in private. Then practice with a friend who won’t judge. Then try it in a low-stakes pickup game where the outcome doesn’t matter. The sequence is non-negotiable. Public failure early destroys confidence.
Your first successful rainbow in a game will feel accidental. That’s fine. The second one will feel intentional. By the third, you’ll know whether the defender is too close.
The physical part takes about three weeks of daily ten-minute drills. The mental part takes one moment of deciding to try it when the opportunity appears. If you wait for the perfect moment, it never comes. You have to create it by dribbling at a defender and committing.
I learned the rainbow flick on concrete outside my apartment. The first time I tried it in a Sunday league game, I mistimed the trap and the ball rolled straight to the defender. He took it and scored. The next week, I got the distance right, one yard, and it worked. The embarrassment of the first fail was the price for the second success.
The Tools You Actually Need
You don’t need special equipment. You need the right conditions.
A Size 5 soccer ball is standard. A smaller ball is harder to control for this trick. A flat, dry training surface is critical. Trying this on wet grass or mud increases the chance the ball slips during the roll. Your soccer cleats matter more than you think. Clean, dry soles grip the ball better during the trap. Worn-down studs or wet cleats reduce control.
A soccer rebounder is useful for the final stage. After you flick the ball over a defender, it lands somewhere. A rebounder sends it back to you, letting you repeat the sequence without chasing. It turns a one-off trick into a drill.
Good soccer socks, specifically grip socks, can help with foot-to-ball contact. They add a bit of texture that holds the ball during the ankle-lock variation. They’re not essential for the classic rainbow, but they help.
Finally, your shin guards are irrelevant for learning the trick, but wear them when practicing over a defender. A mistimed flick can send the ball into your own shins. It’s a rare outcome, but it happens.
How to Avoid Strain and Injury
The rainbow flick stresses your calf and ankle. The roll-up motion is unnatural. If you force it with bad form, you can strain the peroneal muscles along the outside of your lower leg.
Warm up your ankles and calves before practice. Rotate your ankles, stretch your calves, and do some light jogging. Cold muscles will rebel against the sharp, scooping motion.
If you feel sharp pain on the outside of your leg during the roll, stop. That’s a sign you’re using your foot’s outer edge, not the inside. Correct your foot angle. The pain usually disappears when you use the proper inside-foot cradle.
Practice for ten minutes a day, not an hour. Repetitive strain comes from overdoing a novel motion. Ten minutes builds the muscle memory without taxing the tendons.
After two weeks, your calves will adapt. The motion becomes fluid. If it still hurts after two weeks, you’re likely leaning too far forward and putting extra weight on your flicking leg. Adjust your posture. The lean is a torso dip, not a full-weight shift onto one foot.
Frequently Asked Questions
Is the rainbow flick allowed in professional soccer?
Yes, it’s legal. The Wikipedia entry on the rainbow kick notes it’s a recognized skill move. However, referees can deem it dangerous play or unsporting behavior if executed in a reckless manner, like flicking the ball at an opponent’s face. Players like Neymar and Jay-Jay Okocha have used it without sanction.
Can you do a rainbow flick with any soccer ball?
standard Size 5 ball is ideal. Smaller balls (Size 4 or 3) are harder to control during the roll because they have less surface area to press against your calf. Larger, heavier balls require more force for the flick and can strain your ankle.
How long does it take to learn the rainbow flick?
With daily ten-minute drills, the stationary version takes about a week to get consistent. Adding the dribbling layer takes another week. Executing it reliably over a defender in a game situation takes a third week. Rushing the stages leads to failure at the next stage because the muscle memory doesn’t transfer.
What’s the most common reason the rainbow fails?
The ball isn’t pressed firmly enough against the calf during the roll. A gentle touch lets the ball spin away. You need to cradle it with the inside of your foot and sweep it upward with enough force to keep it pinned to your leg until it reaches your heel.
Should I practice on grass or concrete?
Concrete first. The ball rolls predictably on a flat, hard surface. Grass adds variables like moisture and unevenness. Once you can do ten consecutive rainbows on concrete, move to grass to adapt to the real playing conditions.
Can you do a rainbow flick without dribbling?
Yes, via the Ronaldinho flick-up variation. You lock the ball between your ankles and flick it upward with both heels. This is useful when you’re stationary and need to elevate the ball quickly, but it doesn’t send the ball over an opponent’s head like the classic dribbling rainbow.
The Bottom Line
The rainbow flick works when you build it layer by layer: stationary roll, stationary flick, the combined motion, dribbling, then the defender. Skip a layer and the next one collapses. The forward lean is the secret that turns a vertical kick into an overhead arc. Practice for ten minutes a day on concrete before moving to grass. Use it in a game only when you have space behind an isolated defender, attempting it in a crowded midfield is a giveaway. It’s a showboat move, but when it works, it changes the angle of play completely.

I come from the “soccer heart” of Germany, the Ruhrpott. I have played, trained and followed soccer all my life and am a big fan of FC Schalke 04. I also enjoy following international soccer extensively.