How to Head a Soccer Ball Safely | 7 Rules for Youth & Adults
To head a soccer ball safely, you must match three things: correct technique (forehead contact, squared body, core push), age-appropriate limits (no heading under U10, phased introduction after), and controlled equipment (proper ball size, lower inflation pressure). Skipping any one increases head acceleration and concussion risk within a single session.
Most players get the first part wrong. They think heading is about jumping high and being brave. It is not. It is about a specific, repeatable mechanical action that keeps your brain from rattling inside your skull. The bravery is in doing the boring drills correctly, not in the game moment.
This guide covers the seven non-negotiable rules. We will break down the technique that actually works, the national federation guidelines most parents have never read, and the equipment choices that cut impact force by a measurable percentage. This is not just about avoiding a headache tomorrow. It is about playing for another twenty years.
Key Takeaways
- Contact point is non-negotiable. The ball must strike the flat, hard center of your forehead. Hitting the top or side of the head transfers force directly to the thinner temporal bone and multiplies concussion risk instantly.
- Youth guidelines are strict for a reason. Canada Soccer and US Soccer ban heading for players under age 10 (U6-U10) and limit repetitions for U11-U15 players to 5-10 headers per week in training. This phased introduction is based on neck strength and brain development timelines.
- Ball pressure changes everything. A ball inflated to the lowest allowable pressure (6 psi / 0.4 bar for a Size 5) can reduce head impact kinematics by up to 20% compared to a ball at maximum pressure. This is a free safety intervention most teams ignore.
- Neck strength is about rate of force, not size. Traditional weightlifting for a thick neck is less effective than neuromuscular neck training—exercises that teach your neck muscles to fire quickly and stabilize the head before impact. Think isometric holds and rapid resistance bands, not just shrugs.
- If you feel anything off, you are done. A slight headache, dizziness, or fogginess after a header is a concussion symptom. Continuing to play that day can lead to Second Impact Syndrome, where a second blow causes catastrophic brain swelling. The timeline from symptom to catastrophe can be minutes.
What Does “Safe Heading” Actually Mean?
Safe heading means controlling the variables that increase head acceleration. It is a physics problem, not a toughness test. A 2024 systematic review in the Journal of Athletic Training identified the primary factors: ball speed, ball mass, inflation pressure, and the player’s neck muscle engagement timing. Your technique directly influences the last one.
The goal is to turn your head and torso into a unified, stiff lever at the moment of contact. A loose neck acts like a whip, allowing the skull to accelerate independently from the body. That differential acceleration is what strains the brain tissue. Good proper heading technique turns your entire upper body into a shock absorber.
A purposeful soccer header generates head accelerations ranging from 15 to 60 g-forces. The higher end of that range overlaps with accelerations known to cause concussion in American football tackles. This data comes from sensor studies cited in the PMC systematic review on heading factors.
TL;DR: Safe heading is about reducing g-forces on your brain by using your body as a single, stiff unit. Technique controls the physics.
What Age Can Kids Start Heading?
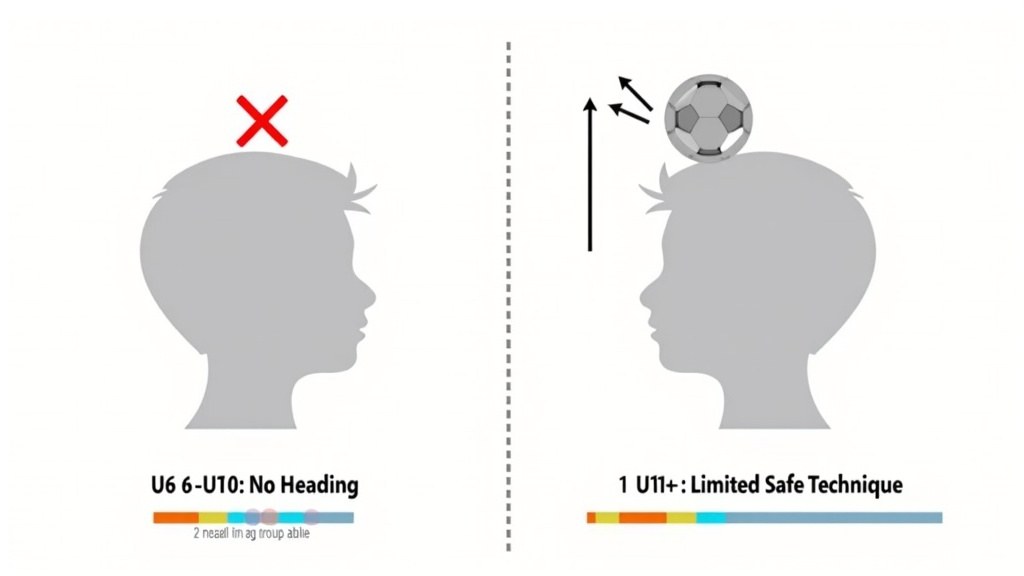
Follow the national guidelines. They exist because children’s neck muscles are underdeveloped and their brains are still myelinating. The St. Louis Children’s Hospital safety guide distills the major federation rules into a simple timeline for parents and coaches.
Canada Soccer’s phased approach is the model. I have seen a U9 team in Gelsenkirchen get a new coach who thought heading drills were “character-building.” Two kids got headaches and were out for a week. The club director suspended the coach. The rules are there because the alternative is real harm.
| Age Group (Canada Soccer) | Heading in Matches | Training Recommendation | Max Headers/Session |
|---|---|---|---|
| U6 – U10 | Not allowed | Do not introduce | 0 |
| U11 – U12 | Low priority | Basic technique, 1x/week | 5 per player |
| U13 – U15 | Low priority | Varied situations, 1x/week | 10 per player |
| U16+ | Allowed | Focus on safe technique | No set limit |
The “low priority” designation is critical. It means coaches should design practices that emphasize dribbling and ground passing. For U11-U15, use lightweight balls or reduce pressure. The repetition limits are hard ceilings. Exceeding them ignores the cumulative effect of sub-concussive impacts, which a Frontiers neurology pupillary reflex study suggests may affect brainstem function even without a diagnosed concussion.
Common mistake: Letting a talented 9-year-old “practice” headers because they are physically big for their age. Neck muscle development lags behind skeletal growth. That size mismatch means their neck cannot stabilize their head effectively, and head acceleration can be 30% higher than in a smaller peer with a proportionally stronger neck.
TL;DR: No heading before age 10. From ages 11-15, limit reps severely and always use a lighter ball. This is not a suggestion.
The 5-Step Safe Heading Technique
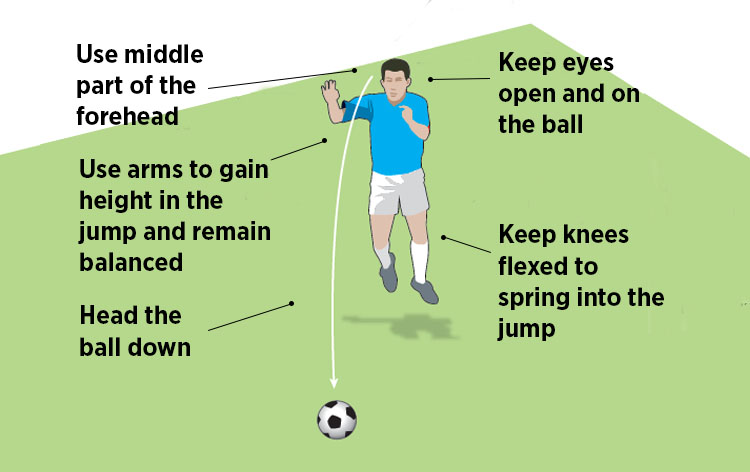
This is the core physical skill. It works for a defensive heading clearance or an attacking headers finish. The mechanics are identical; the intention changes.
1. Watch the Ball onto Your Forehead
Your eyes must stay open. Track the ball’s seam from the moment it leaves the passer’s foot. Closing your eyes causes you to misjudge distance and tilt your head, leading to contact on the temple or crown. That mistake transfers force directly to the thinner bones of the skull.
2. Square Your Body to the Target
Your shoulders and hips must face where you want the ball to go. A common error is turning sideways and swinging at a cross like a baseball bat. This cuts your power in half and exposes your temple. Even for a glancing header, your base alignment should be square before you adjust your neck.
3. Strike with the Forehead Center
The contact point is the flat, hard bone in the exact center of your forehead, where your hairline starts. Not the soft spot above your eyebrows, not the curved top of your skull. You can feel the spot with your fingers. This is the thickest part of your frontal bone, designed to absorb impact.
4. Push Forward with Your Core
This is the “why” most players miss. Heading power comes from your torso, not your neck. Tighten your stomach and back muscles as you jump or plant your feet. Use that solid platform to push your head forward through the ball. Your neck muscles should be isometrically stiff, not whipping.
5. Follow Through Toward Your Target
Your head continues moving in the direction you want the ball to go after contact. This follow-through steers the ball and dissipates residual energy. Stopping your head abruptly at contact means your skull absorbs the full deceleration. That energy goes straight into your brain.
TL;DR: Eyes open, body square, hit with the forehead center, power from the core, follow through. It is a punch with your head, not a flick.
The Right Ball Matters More Than You Think
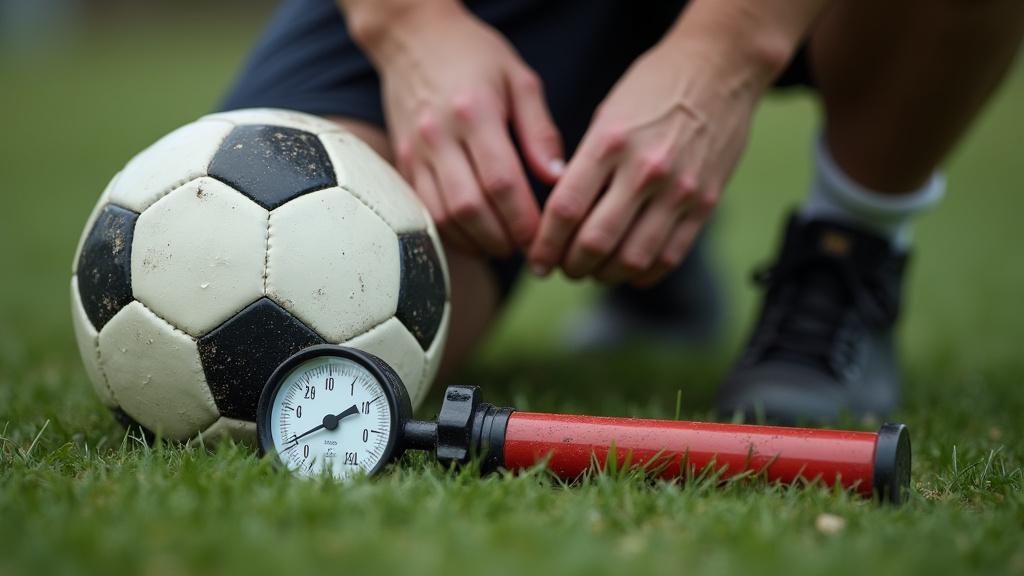
Not all soccer balls are equal for training. The soccer ball construction—the bladder, the panel count, the outer material—affects weight and rebound. But for safety, the two adjustable variables are size and pressure.
| Ball Type / Setting | Best For | Safety Rationale |
|---|---|---|
| Size 3 (23-24″) | U8 and below | Lighter mass (290-320g) reduces force. Not for heading training. |
| Size 4 (25-26″) | U9-U12 | Official match ball for age group. Use at lowest allowed pressure (6 psi). |
| Size 5 (27-28″) | U13+ & Adult | Standard ball. Always inflate to lower end of range (7-8 psi, not 9-10 psi). |
| Rubber / Foam Training Ball | All youth heading drills | Up to 40% lighter weight. Dramatically reduces rotational acceleration on the brain. |
The research is clear. A study in Annals of Biomedical Engineering found that reducing a Size 5 ball’s pressure from its maximum (10 psi) to the minimum (6 psi) decreased peak head acceleration by an average of 18%. For a youth player, that is the difference between a safe training session and a headache that lingers.
I keep a separate, under-inflated ball for heading drills. The difference in feel is immediate. The ball gives slightly on contact, like a firm pillow. The sound is a dull thud instead of a sharp pop. That acoustic cue tells you the energy is being absorbed by the ball’s deformation, not your skull.
Common mistake: Using a brand-new, rock-hard match ball for a heading drill to “toughen up” players. This is negligent. That ball at maximum pressure turns every header into a high-impact event. It is the fastest way to make players develop a flinching habit that ruins their technique forever.
TL;DR: Use the smallest, lightest ball allowed for the age group. Inflate it to the lowest pressure printed on the ball. For dedicated training, buy a rubber ball.
Building a Safer Neck: It’s Not About Bulk
Strong neck muscles are your body’s built-in headrest. But not all strength is the same. For heading, you need neuromuscular neck training—the ability to rapidly stiffen those muscles before impact. This is a function of the nervous system, not just muscle size.
A thick neck from heavy shrugs might look protective, but if those muscles fire 50 milliseconds too slow, they are useless. The impact is over in 20 milliseconds. Your training must mimic the heading action: quick, anticipatory stabilization.
Here are three exercises that target the right muscles with the right timing. Integrate them into your soccer workout plan twice a week.
-
Isometric Neck Holds (All Directions)
Sit upright. Press your palm against your forehead and push your head forward while resisting with your neck. Hold for 5 seconds. Repeat pushing to the back, left, and right sides. The goal is to feel the deep neck flexors and extensors engage, not the big trapezius muscles. Do 3 sets of 5 holds per direction.
Skip this, and your neck will buckle on the first contested header, letting your head snap back. -
Band-Resisted Head Turns
Attach a resistance band to a fixed point at head height. Stand facing away from the anchor point with the band around your forehead. Quickly turn your head to look over one shoulder against the band’s pull, then return to center. The band provides dynamic resistance that trains rate of force development. Do 2 sets of 10 turns per side.
This trains the sternocleidomastoid muscles to fire rapidly during a glancing header, preventing whiplash. -
Supine Head Nods
Lie on your back on the floor, knees bent. Slowly nod your head, bringing your chin toward your chest without lifting your shoulders off the ground. Hold the nod for 2 seconds, then release. This isolates the longus colli and longus capitis—the deep neck flexors that are the primary stabilizers. Do 3 sets of 12 nods.
Weak deep flexors force the larger surface muscles to do all the work. They fatigue quickly, and stability fails by the second half.
TL;DR: Train your neck for speed, not just size. Isometric holds and band work teach the muscles to fire before the ball arrives.
Safety Gear and On-Field Protocols
Protection extends beyond your body. Your essential protective gear includes a properly fitted mouthguard. Studies show a mouthguard can reduce the transmission of impact forces through the jaw to the base of the skull. It is not just for protecting teeth.
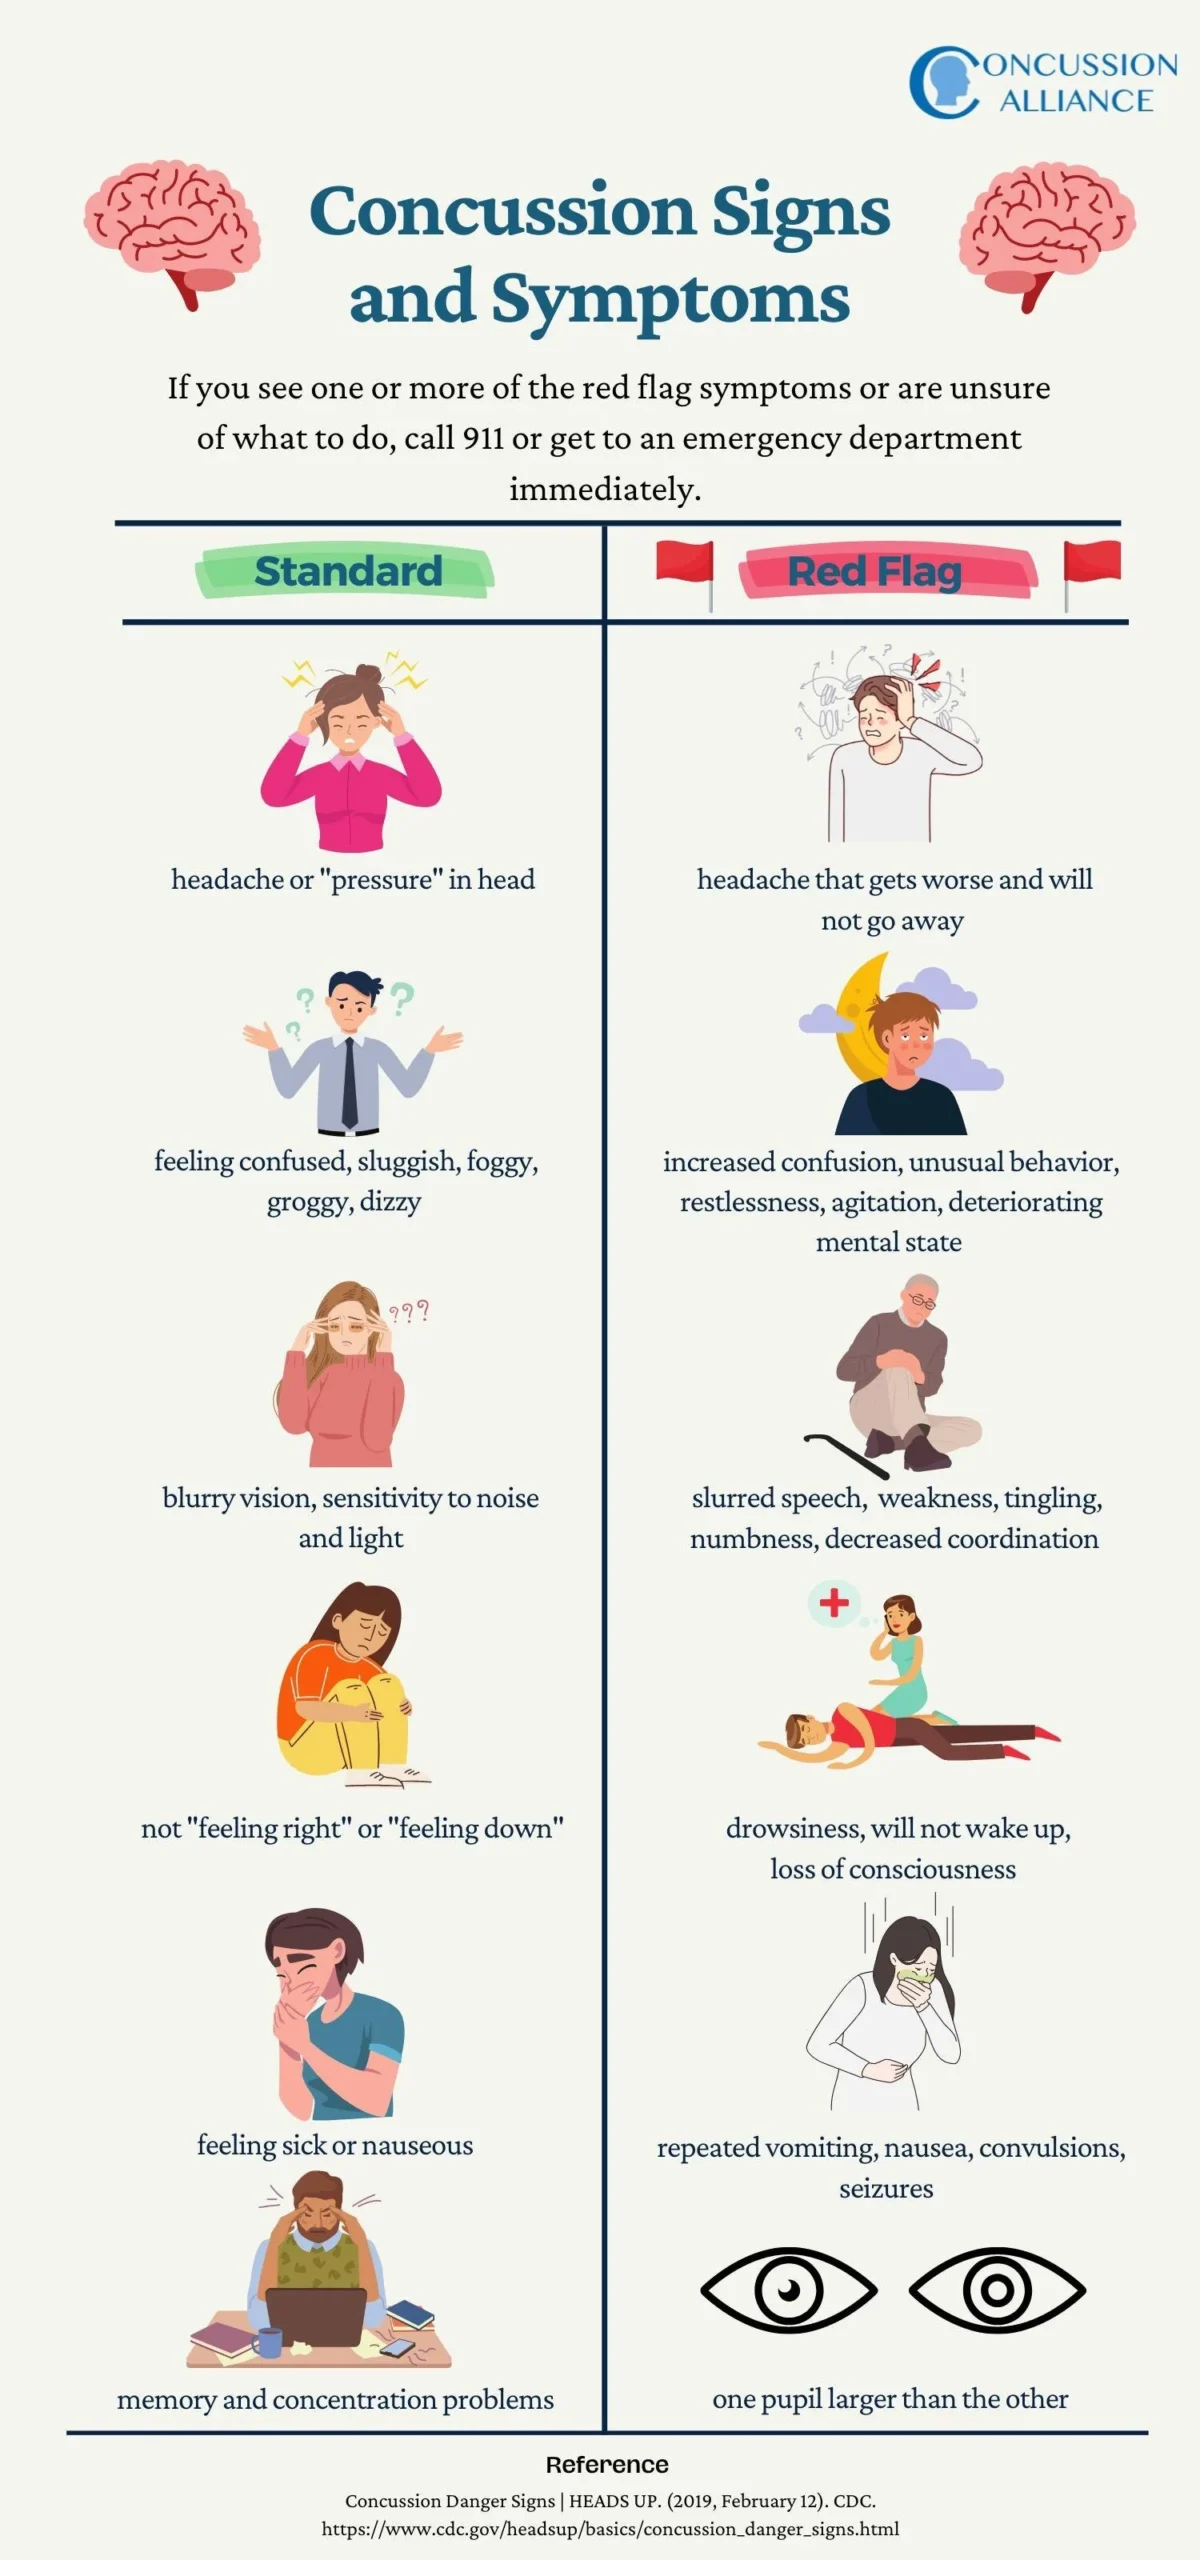
More critical than any gear is the protocol for what happens after a header. Every coach and player must know the concussion red flags:
– Headache or pressure in the head
– Dizziness or balance problems
– Nausea or vomiting
– Feeling “foggy” or slowed down
– Sensitivity to light or noise
If a player shows any one of these symptoms, they are removed from play. Immediately. The return-to-play process is not a same-day decision. It requires clearance from a medical professional following a graduated protocol over several days. I have seen a regional league player in Germany try to “run off” a headache. He collapsed at halftime and spent the night in the hospital for observation. His season was over.
Communication is also safety gear. A loud “Keeper’s!” or “Away!” prevents the most dangerous head-to-head collisions. In a crowded penalty area, this verbal call is as important as your jump.
TL;DR: Wear a mouthguard. Know the concussion symptoms and have a zero-tolerance policy for playing through them. Your voice is a collision avoidance tool.
How to Practice Without Risk
You can train heading effectively without banging balls for an hour. The key is controlling the service. Use a soccer rebounder or a partner who can deliver soft, arcing passes to your forehead from a short distance (10-15 feet). Start stationary, focusing purely on technique.
A progressive drill sequence looks like this:
1. Stationary Forehead Taps: Have a partner hold the ball gently against your forehead. Practice the nodding motion and core engagement without any impact force. Feel the correct muscle activation.
2. Self-Serve Headers: Toss the ball up gently with your own hands and head it back to your hands. This lets you control the height, spin, and pace perfectly as you groove the motion.
3. Partner Serve from Short Distance: Your partner throws a soft, looping ball directly to your forehead from 10 feet away. Your only job is to make perfect technical contact back to their hands.
4. Moving to the Ball: Add a two-step approach before the partner’s serve. Focus on keeping your eyes open and your body square while moving.
Limit repetitions per session based on age. Even for adults, more than 20 quality headers in a single drill session yields diminishing returns and increasing fatigue. Fatigue leads to sloppy technique, and sloppy technique is where injuries happen.
TL;DR: Quality over quantity. Use a rebounder or a trusted partner for controlled serves. Start with no-impact drills to program the muscle memory.
Frequently Asked Questions
What is the most common heading mistake that leads to injury?
Closing the eyes. It causes players to tilt their head and make contact on the temple or crown. The temple bone is thin and transmits force directly to the middle meningeal artery, raising the risk of not just concussion but also a rare epidural hematoma. Keep your eyes open until you feel the ball on your forehead.
Can heading a soccer ball cause long-term brain damage?
The current scientific consensus, reflected in the safety research, is that repetitive sub-concussive impacts from heading may contribute to long-term neurological issues. The link is not as definitive as in American football, but it is a concern. This is precisely why limiting repetitions for youth players and using perfect technique is non-negotiable—it minimizes the lifetime dose of impacts.
Are some soccer balls safer for heading than others?
Yes. Rubber or foam-filled training balls are significantly lighter than standard laminated balls and are excellent for technique drills. For standard balls, the modern ball design of a 32-panel thermally bonded ball tends to have more consistent flight and a slightly softer feel than a stitched, 18-panel ball. But the most important factor is always inflation pressure.
How do I know if my neck is strong enough for heading?
simple field test: lie on your back and have a partner try to gently push your head sideways with one hand. If you can easily resist the push and keep your head perfectly still, your isometric stability is good. If your head moves easily, you need to prioritize the neuromuscular exercises listed above before doing any significant heading work.
Is it safer to head a wet ball?
No. A waterlogged ball is heavier. Mass is a direct multiplier of impact force. A Size 5 ball can absorb up to 20% of its weight in water, increasing its mass from 450g to over 500g. That extra 50 grams translates to a measurable increase in head acceleration. Avoid heading drills in heavy rain or with soaked balls.
Before You Go
Heading is a skill, not a reflex. Treat it with the same deliberate practice you give your first touch or your shooting technique. Start with the rules: know the age guidelines, deflate the ball, and build a fast neck.
The technique is a five-part sequence. Drill it slowly until the movement is automatic. Your brain’s health depends on the quality of that motor program. There is no trophy for practicing with a rock-hard ball.
Finally, listen to your body. A single headache after heading is a stop sign, not a challenge. The culture is shifting from “shake it off” to “sit it out.” Be part of that shift. It keeps you, and the players you coach or parent, in the game for the long run.

I come from the “soccer heart” of Germany, the Ruhrpott. I have played, trained and followed soccer all my life and am a big fan of FC Schalke 04. I also enjoy following international soccer extensively.